内容纲要
一、ansible 常用指令总结,并附有相关示例。
###### 1、去掉检查第一次连接询问,及生成默认配置文件,修改默认模块为shell
vim /etc/ansible/ansible.cfg
#去掉注释
host_connection_checking = False
或者修改ssh_config的配置文件里的询问选项
ansible-config init --disabled > /etc/ansible/ansible.cfg
vim /etc/ansible/ansible.cfg
module_name=shell
#command模块功能单一,不支持特殊符号 |、<、>等
```
###### 2、ansible主机清单参数
ansible_ssh_host #将要连接的远程主机名.与你想要设定的主机的别名不同的话,可通过此变量设置.
ansible_ssh_port #ssh端口号.如果不是默认的端口号,通过此变量设置.这种可以使用 ip:端口
192.168.1.100:2222
ansible_ssh_user #默认的 ssh 用户名
ansible_ssh_pass #ssh 密码(这种方式并不安全,我们强烈建议使用 --ask-pass 或 SSH 密钥)
ansible_sudo_pass #sudo 密码(这种方式并不安全,我们强烈建议使用 --ask-sudo-pass)
ansible_sudo_exe (new in version 1.8) #sudo 命令路径(适用于1.8及以上版本)
ansible_connection #与主机的连接类型.比如:local, ssh 或者 paramiko. Ansible 1.2 以前
默认使用 paramiko.1.2 以后默认使用 'smart','smart' 方式会根据是否支持 ControlPersist,
来判断'ssh' 方式是否可行.
ansible_ssh_private_key_file #ssh 使用的私钥文件.适用于有多个密钥,而你不想使用 SSH 代理
的情况.
ansible_shell_type #目标系统的shell类型.默认情况下,命令的执行使用 'sh' 语法,可设置为
'csh' 或 'fish'.
ansible_python_interpreter #目标主机的 python 路径.适用于的情况: 系统中有多个 Python,
或者命令路径不是"/usr/bin/python",比如 \*BSD, 或者 /usr/bin/python 不是 2.X 版本的
Python.之所以不使用 "/usr/bin/env" 机制,因为这要求远程用户的路径设置正确,且要求 "python"
可执行程序名不可为 python以外的名字(实际有可能名为python26).与
ansible_python_interpreter 的工作方式相同,可设定如 ruby 或 perl 的路径....
例:
[test1]
10.0.0.2 ansible_ssh_port=33322 ansible_ssh_user=root ansible_ssh_pass=123456
[test2]
10.0.0.[20:30]
组嵌套
[test3]
test1
test2
#对分组主机统一密码
#对每个分组的所有主机统一定义用户和密码,执行ansible命令时显示别名,如web01
[websrvs]
web01 ansible_ssh_host=10.0.0.101
web02 ansible_ssh_host=10.0.0.102
[websrvs:vars]
ansible_ssh_password=123456
```
###### 3、常用配置选项及范例
--version #显示版本
-m module #指定模块,默认为command
-a module-args,模块指令 一般跟在-m后,例:-m shell -a 'ls /data'
-v #详细过程 -vv -vvv更详细
--list-hosts #显示主机列表,可简写 --list
-C, --check #检查,并不执行
-T, --timeout=TIMEOUT #执行命令的超时时间,默认10s
-k, --ask-pass #提示输入ssh连接密码,默认Key验证
-u, --user=REMOTE_USER #执行远程执行的用户,默认root
-b, --become #代替旧版的sudo实现通过sudo机制实现提升权限
--become-user=USERNAME #指定sudo的runas用户,默认为root
-K, --ask-become-pass #提示输入sudo时的口令
-f FORKS, --forks FORKS #指定并发同时执行ansible任务的主机数
-i INVENTORY, --inventory INVENTORY #指定主机清单文件
例:
ansible all -m ping #默认以root用户只需ping
ansible all -m ping -u zhang k #使用zhang用户执行ping检测并输入密码
ansible all -m ping -u zhang -k -b #使用zhang用户以sudo执行ping检测并输入密码
ansible-doc -s script #显示该模块的部分选项用法,无例子
ansible-doc script #全部显示,篇幅很长,有实例
```
###### 4、script模块
script模块:在远程主机上执行ansible服务器的脚本(无需执行权限),此模块不具有幂等性
chdir=dir #执行命令前,先切换至目录dir
cmd #指定ansible主机的命令
creates=file #当file不存在时才会执行
removes=file #当file存在时才会执行
例:ansible all -m script -a /data/test.sh
```
###### 5、copy模块
功能:复制ansible服务器主控端或远程的本机的文件到远程主机
注意: src=file 如果是没指明路径,则为当前目录或当前目录下的files目录下的file文件
常见选项
范例:
[root@ansible ~]#vim /etc/ansible/ansible.cfg
#修改下面一行
module_name = shell
chdir=dir #执行命令前,先切换至目录dir
cmd #指定ansible主机的命令
creates=file #当file不存在时才会执行
removes=file #当file存在时才会执行
ansible websrvs -m script -a /data/test.sh
src #控制端的源文件路径
dest #被控端的文件路径
owner #属主
group #属组
mode #权限
backup #是否备份
validate #验证成功才会执行copy
remote_src #no是默认值,表示src文件在ansible主机,yes表示src文件在远程主机
#如目标存在,默认覆盖,此处指定先备
ansible websrvs -m copy -a "src=/root/test1.sh dest=/tmp/test2.sh owner=wang mode=600 backup=yes"
#指定内容,直接生成目标文件
ansible websrvs -m copy -a "content='wang 123456\nxiao 654321\n'
dest=/etc/rsync.pas owner=root group=root mode=0600"
#复制/etc目录自身,注意/etc/后面没有/
ansible websrvs -m copy -a "src=/etc dest=/backup"
#复制/etc/下的文件,不包括/etc/目录自身,注意/etc/后面有/
ansible websrvs -m copy -a "src=/etc/ dest=/backup"
#复制/etc/suders,并校验语法
ansible websrvs -m copy -a "src=/etc/suders dest=/etc/sudoers.edit remote_src=yes validate=/usr/sbin/visudo -csf %s"
```
###### 6、get_url模块
用法:将文件用http、https或者ftp下载到被管理节点上
url #下载文件的URL,支持HTTP,HTTPS或FTP协议
dest #下载到目标路径(绝对路径),如果目标是一个目录,就用原文件名,如果目标设置了名称就用目标
设置的名称
owner #指定属主
group #指定属组
mode #指定权限
force #如果yes,dest不是目录,将每次下载文件,如果内容改变替换文件。如果no,则只有在目标不存
在时才会下载
checksum #对目标文件在下载后计算摘要,以确保其完整性
#示例: checksum="sha256:D98291AC[...]B6DC7B97",
checksum="sha256:http://example.com/path/sha256sum.txt"
url_username #用于HTTP基本认证的用户名。 对于允许空密码的站点,此参数可以不使用
`url_password'
url_password #用于HTTP基本认证的密码。 如果未指定`url_username'参数,则不会使用
`url_password'参数
validate_certs #如果“no”,SSL证书将不会被验证。 适用于自签名证书在私有网站上使用
timeout #URL请求的超时时间,秒为单位
例:
[root@ansible ~]#ansible websrvs -m get_url -a 'url=http://nginx.org/download/nginx-1.18.0.tar.gz dest=/usr/local/src/nginx.tar.gz checksum="md5:b2d33d24d89b8b1f87ff5d251aa27eb8"'
```
###### 7、创建定时任务
#创建任务
ansible all -m cron -a 'hour=2 minute=30 weekday=1-5 name="backup mysql" job=/data/sh/backup.sh'
ansible all -m cron -a "minute=*/5 job='/usr/local/sbin/ntpdate ntp1.aliyun.com &>/dev/null' name=Synctime"
#查看结果
ansible all -a 'crontab -l'
#禁用任务
ansible all -m cron -a "minute=*/5 job='/usr/local/sbin/ntpdate ntp1.aliyun.com &>/dev/null' name=Synctime disable=yes"
#查看结果
ansible all -a 'crontab -l'
10.0.0.130 | CHANGED | rc=0 >>
#Ansible: Synctime
#*/5 * * * * /usr/local/sbin/ntpdate ntp1.aliyun.com &>/dev/null
```
###### 8、yum模块
选项:
name #软件包名称
state #状态
=present #安装,此为默认值,可不加
=absent #删除
=latest #最新版
list #列出指定包
enablerepo #启用哪个仓库安装
disablerepo #不使用哪些仓库的包
exclude #排除指定的包
validate #是否检验,默认为yes
例:安装及卸载
ansible all -m yum -a 'name=tree'
ansible all -m yum -a 'name=tree state=absent'
#安装zabbix agent rpm包
[root@ansible ~]#ansible websrvs -m yum -a
'name=https://mirrors.tuna.tsinghua.edu.cn/zabbix/zabbix/5.0/rhel/8/x86_64/zabbi
x-agent2-5.0.24-1.el8.x86_64.rpm state=present validate_certs=no'
#启用epel源进行安装
[root@ansible ~]#ansible websrvs -m yum -a 'name=nginx state=present
enablerepo=epel'
#升级除kernel和foo开头以外的所有包
[root@ansible ~]#ansible websrvs -m yum -a 'name=* state=lastest
exclude=kernel*,foo*'
#删除
[root@ansible ~]#ansible websrvs -m yum -a 'name=httpd state=absent'
[root@ansible ~]#ansible websrvs -m yum -a 'name=sl,cowsay'
```
###### 9、配置yum仓库
#常见选项
name #仓库id
description #仓库描述名称,对应配置文件中的name=
baseurl #仓库的地址
gpgcheck #验证开启
gpgkey #仓库公钥路径
例:
ansible wordpress -m yum_repository -a 'name=ansible_nginx description="nginx repo" baseurl="http://nginx.org/packages/centos/$releasever/$basearch/" gpgcheck=yes gpgkey="https://nginx.org/keys/nginx_signing.key"'
```
###### 10、service模块
#常见选项
name 服务名称
state 服务状态
=started 启动
=stopped 停止
=restarted 重启
=reloaded 重新载入
enabled 开机自启
daemon_reload 加载新的配置文件,使用于systemd模块
例:
ansible all -m service -a 'name=httpd state=started enabled=yes'
ansible all -m service -a 'name=httpd state=stopped'
ansible all -m service -a 'name=httpd state=reloaded'
ansible all -m shell -a "sed -i 's/^Listen 80/Listen 8080/' /etc/httpd/conf/httpd.conf"
ansible all -m service -a 'name=httpd state=restarted'
#重启动指定网卡服务
ansible all -m service -a 'name=network state=absent args=eth0'
```
###### 11、User 模块
name #创建的名称
uid #指定uid
group #指定基本组
shell #登录shell类型默认/bin/bash
create_home #是否创建家目录
password #设定对应的密码,必须是加密后的字符串才行,否则不生效
system #yes表示系统用户
groups #附加组
append #追加附加组使用,yes表示增加新的附加组
state #absen删除
remove #yes表示删除用户时将家目录一起删除
generate_ssh_key #创建私钥
ssh_keyu_bits #私钥位数
ssh_key_file #私钥文件路径
范例:
创建用户
ansible all -m user -a 'name=user1 comment="test user" uid=2048 home=/app/user1
group=root'
ansible all -m user -a 'name=nginx comment=nginx uid=88 group=nginx groups="root,daemon" shell=/sbin/nologin system=yes create_home=no home=/data/nginx non_unique=yes'
#remove=yes表示删除用户及家目录等数据,默认remove=no
ansible all -m user -a 'name=nginx state=absent remove=yes'
#生成123456加密的密码
ansible localhost -m debug -a "msg={{ '123456'| password_hash('sha512','salt')}}"
localhost | SUCCESS => { "msg": "$6$salt$MktMKPZJ6t59GfxcJU20DwcwQzfMvOlHFVZiOVD71w."
}
#用上面创建的密码创建用户
ansible websrvs -m user -a 'name=www group=www system=yes shell=/sbin/nlogin password="$6$salt$MktMKPZJ6t59GfxcJU20DwcwQzfMvOlHFVZiOVD71w."'
#创建用户test,并生成4096bit的私钥
ansible websrvs -m user -a 'name=test generate_ssh_key=yes ssh_key_bits=4096 ssh_key_file=.ssh/id_rsa'
```
###### 12、fetch模块--抓取远程主机的文件打ansible控制端
功能:从远程主机提取文件至ansible的主控端,copy相反,目前不支持目录
src #被控制端的源文件路径,只支持文件
dest #ansible控制端的目录路径
例:
ansible all -m fetch -a 'src=/root/redhat-release dest=/data/kernel'
#ansible将文件复制过来后会自动创建所属服务器的ip地址文件夹,和dest设置的文件夹两级目录,避免多个服务器同一个文件名字重复
结果:
[root@rocky4 tmp]#tree /data/
/data/
├── 10.0.0.128
│ └── etc
│ └── redhat-release
├── 10.0.0.129
│ └── etc
│ └── redhat-release
├── 10.0.0.130
│ └── etc
│ └── redhat-release
```
###### 13、file模块--设置文件属性,创建文件,目录和软链接等
path #在被控端创建的路径
owner #属主
group #属组
mode #权限
state #状态
=touch #创建文件
=directory #创建目录
=link #软链接
=hard #硬链接
=absent #删除
recurse #yes表示递归授权
例:
#创建文件及设置所有者和权限
ansible all -m file -a 'path=/data/f1.txt state=touch owner=zhang mode=600'
#删除文件
ansible all -m file -a 'path=/data/f1.txt state=absent'
#创建软链接
ansible web -m file -a 'src=/etc/fstab dest|path|name=/data/fstab-link state=link'
#创建硬链接
ansible web -m file -a 'src=/etc/fstab name=/data/fstab-link state=hard'
#创建目录
ansible web -m file -a 'path=/data/fstab state=directory'
#递归修改目录属性,但不递归至子目录
ansible all -m file -a "path=/data/mysql state=directory owner=mysql
group=mysql"
#递归修改目录及子目录的属性
ansible all -m file -a "path=/data/mysql state=directory owner=mysql group=mysql recurse=yes"
```
###### 14、 unarchive 模块-解压缩
实现有两种用法:
1、将ansible主机上的压缩包传到远程主机后解压缩至特定目录,设置remote_src=no,此为默认值,可省略
2、将远程本主机上或非ansible的其它主机的某个压缩包解压缩到远程主机本机的指定路径下,需要设置remote_src=yes
常用参数:
remote_src #和yes表示源文件在远程主机上,no表示在ansible主机上,默认为no
src #源路径,可以是ansible主机的路径,也可是远程主机的路径,如果是远程主机的路径需加remote_src
dest #远程主机上的目标路径
mode #设置解压后的文件权限
creates=/path/file #当绝对路径/path/file不存在时才会执行
例:
ansible all -m unarchive -a 'src=/opt/nginx.tar.gz dest=/apps/nginx owner=nginx mode=0755 group=nginx creates=/apps/nginx remote_src=yes'
#解压所有远程主机/opt下的nginx.tar.ga文件到远程主机/apps/nginx下,如果没有此文件夹则创建,所有者和所属组都是nginx,权限为755
ansible websrvs -m unarchive -a 'src=https://releases.ansible.com/ansible/ansible-2.1.6.0-0.1.rc1.tar.gz dest=/data/ owner=root remote_src=yes'
#下载链接中的文件并解压到远程主机的/data下,所有者为root
```
###### 15、Archive 模块---打包压缩保存在被管理节点
常见选项:
path #压缩的文件或目录
dest #压缩后的文件
format #压缩格式,支持gz,bz2,xz,tar,zip
ansible websrvs -m archive -a 'path=/var/log/ dest=/data/log.tar.bz2 format=bz2 owner=wang mode=0600'
#打包远程主机下的/var/log文件夹并保存到/data下命名为log.tar.bz2,压缩格式为bz2,所有者为wang,权限为600
```
###### 16、hostname模块
ansible 10.0.0.100 -m hostname -a'name=node1.rocky.cn'
```
###### 17、cron模块--计划任务
name #描述脚本的作用
minute #分钟
hour #小时
weekday #周
user #任务由哪个用户运行;默认root
job #任务
ansible websrvs -m cron -a "minute=*/5 job='/usr/sbin/ntpdate ntp.aliyun.com &>/dev/null' name=Synctime"
#禁用任务在此条命令最后加一句disabled=yes即可
ansible websrvs -m cron -a 'state=absent name=Synctime'
#删除任务
```
###### 18、selinux模块
ansible db-server -m selinux -a 'state=disabled'
```
###### 19、 Lineinfile 模块
**ansible在使用sed进行替换时,经常会遇到需要转义的问题,而且ansible在遇到特殊符号进行替换时,会存在问题,无法正常进行替换 。ansible自身提供了两个模块:lineinfile模块和replace模块,可以方便的进行替换 一般在ansible当中去修改某个文件的单行进行替换的时候需要使用lineinfile模块**
**功能:相当于sed,主要用于修改一行的文件内容**
path #被控端文件的路径
regexp #正则匹配语法格式,表示被替换的内容
line #替换为的内容
state #absent表示删除
insertafter #插入到替换内容前面,如和regexp同时存在,只在没找到与regexp匹配时才使用
insertafter
insertbefore #插入到替换内容后面,如和regexp同时存在,只在没找到与regexp匹配时才使用
insertafter
backrefs #支持后面引用,yes和no
backup #修改前先备份
create #如果文件不存在,则创建,默认不存在会出错
mode #指定权限
owner #指定用户
group #指定组
#注意
regexp参数 :使用正则表达式匹配对应的行,当替换文本时,如果有多行文本都能被匹配,则只有最后面被
匹配到的那行文本才会被替换,当删除文本时,如果有多行文本都能被匹配,那么这些行都会被删除。
例:
#修改httpd默认监听端口
ansible web-node1 -m lineinfile -a "path=/etc/httpd/conf/httpd.conf regexp='^Listen' line='Listen 8080'"
#给主机增加一个网关,但需要增加到NAME=下面
ansible webservers -m lineinfile -a 'path=/etc/sysconfig/network-scripts/ifcfg-eth0 insertafter="^NAME=" line="GATEWAY=10.0.0.254"'
#效果
cat /etc/sysconfig/network-scripts/ifcfg-eth0
DEVICE=eth0
NAME=eth0
GATEWAY=10.0.0.254
#删除网关
ansible webservers -m lineinfile -a 'path=/etc/sysconfig/network-scripts/ifcfgeth0 regexp="^GATEWAY" state=absent'
#删除#开头的行
ansible all -m lineinfile -a 'dest=/etc/fstab state=absent regexp="^#"'
```
###### 20、replace模块--修改多行
该模块有点类似于sed命令,主要也是基于正则进行匹配和替换,建议使用
功能: 多行修改替换
path #被控端文件的路径
regexp #正则匹配语法格式,表示被替换的内容
replace #替换为的内容
after #插入到替换内容前面,
before #插入到替换内容后面
backup #修改前先备份
mode #指定权限
owner #指定用户
group #指定组
#修改db主机下的/etc/fstab文件,以UUID开头的行为分组,在行前加注释
ansible db -m replace -a "path=/etc/fstab regexp='^(UUID.*)' replace='#\1'"
#修改db主机下的/etc/fstab文件,以#UUID开头的行为分组,去掉行前注释
ansible db -m replace -a "path=/etc/fstab regexp='^#(UUID.*)' replace='\1'"
```
###### 21、setup模块--查看主机信息
setup 模块来收集主机的系统信息,这些 facts 信息可以直接以变量的形式使用,但是如果主机
较多,会影响执行速度
可以使用 gather_facts: no 来禁止 Ansible 收集 facts 信息
filter #指定过滤条件
例:
ansible all -m setup
ansible all -m setup -a "filter=ansible_nodename"
ansible all -m setup -a "filter=ansible_hostname"
ansible all -m setup -a "filter=ansible_domain"
ansible all -m setup -a "filter=ansible_memtotal_mb"
ansible all -m setup -a "filter=ansible_memory_mb"
ansible all -m setup -a "filter=ansible_memfree_mb"
ansible all -m setup -a "filter=ansible_os_family"
ansible all -m setup -a "filter=ansible_distribution"
ansible all -m setup -a "filter=ansible_distribution_major_version"
ansible all -m setup -a "filter=ansible_distribution_version"
ansible all -m setup -a "filter=ansible_processor_vcpus"
ansible all -m setup -a "filter=ansible_all_ipv4_addresses"
ansible all -m setup -a "filter=ansible_architecture"
ansible all -m setup -a "filter=ansible_uptime_seconds"
ansible all -m setup -a "filter=ansible_processor*"
ansible all -m setup -a 'filter=ansible_env'
```
###### 22、sysctl模块--优化内核参数
name #内核参数
value #指定值
state #是否保存在sysctl.conf文件中,默认present
sysctl_set #使用sysctl -w 验证值生效
#开启ip_forward功能
ansible websrvs -m sysctl -a 'name=net.ipv4.ip_forward value=1 state=present'
yml例子:
- name: Change Port Range
sysctl:
name: net.ipv4.ip_local_port_range
value: '1024 65000'
sysctl_set: yes
- name: Enabled Forward
sysctl:
name: net.ipv4.ip_forward
value: '1'
sysctl_set: yes
- name: Enabled tcp_reuse
sysctl:
name: net.ipv4.tcp_tw_reuse
value: '1'
sysctl_set: yes
- name: Chanage tcp tw_buckets
sysctl:
name: net.ipv4.tcp_max_tw_buckets
value: '5000'
sysctl_set: yes
- name: Chanage tcp_syncookies
sysctl:
name: net.ipv4.tcp_syncookies
value: '1'
sysctl_set: yes
- name: Chanage tcp max_syn_backlog
sysctl:
name: net.ipv4.tcp_max_syn_backlog
value: '8192'
sysctl_set: yes
- name: Chanage tcp Established Maxconn
sysctl:
name: net.core.somaxconn
value: '32768'
sysctl_set: yes
state: present
- name: Chanage tcp_syn_retries
sysctl:
name: net.ipv4.tcp_syn_retries
value: '2'
sysctl_set: yes
state: present
- name: Chanage net.ipv4.tcp_synack_retries
sysctl:
name: net.ipv4.tcp_synack_retries
value: '2'
sysctl_set: yes
state: present
二、总结ansible playbook目录结构及文件用途。
一个playbook 中由多个组件组成,其中所用到的常见组件类型如下:
1、 Hosts 执行的远程主机列表
2、Tasks 任务集,由多个task的元素组成的列表实现,每个task是一个字典,一个完整的代码块功能需最少元素需包括 name 和 task,一个name只能包括一个task
3、Variables 内置变量或自定义变量在playbook中调用
4、Templates 模板,可替换模板文件中的变量并实现一些简单逻辑的文件
5、Handlers 和 notify 结合使用,由特定条件触发的操作,满足条件方才执行,否则不执行
6、 tags 标签 指定某条任务执行,用于选择运行playbook中的部分代码。ansible具有幂等性,因此会自动跳过没有变化的部分,即便如此,有些代码为测试其确实没有发生变化的时间依然会非常地长。此时,如果确信其没有变化,就可以通过tags跳过此些代码片断
三、使用ansible playbook实现一个mysql角色。
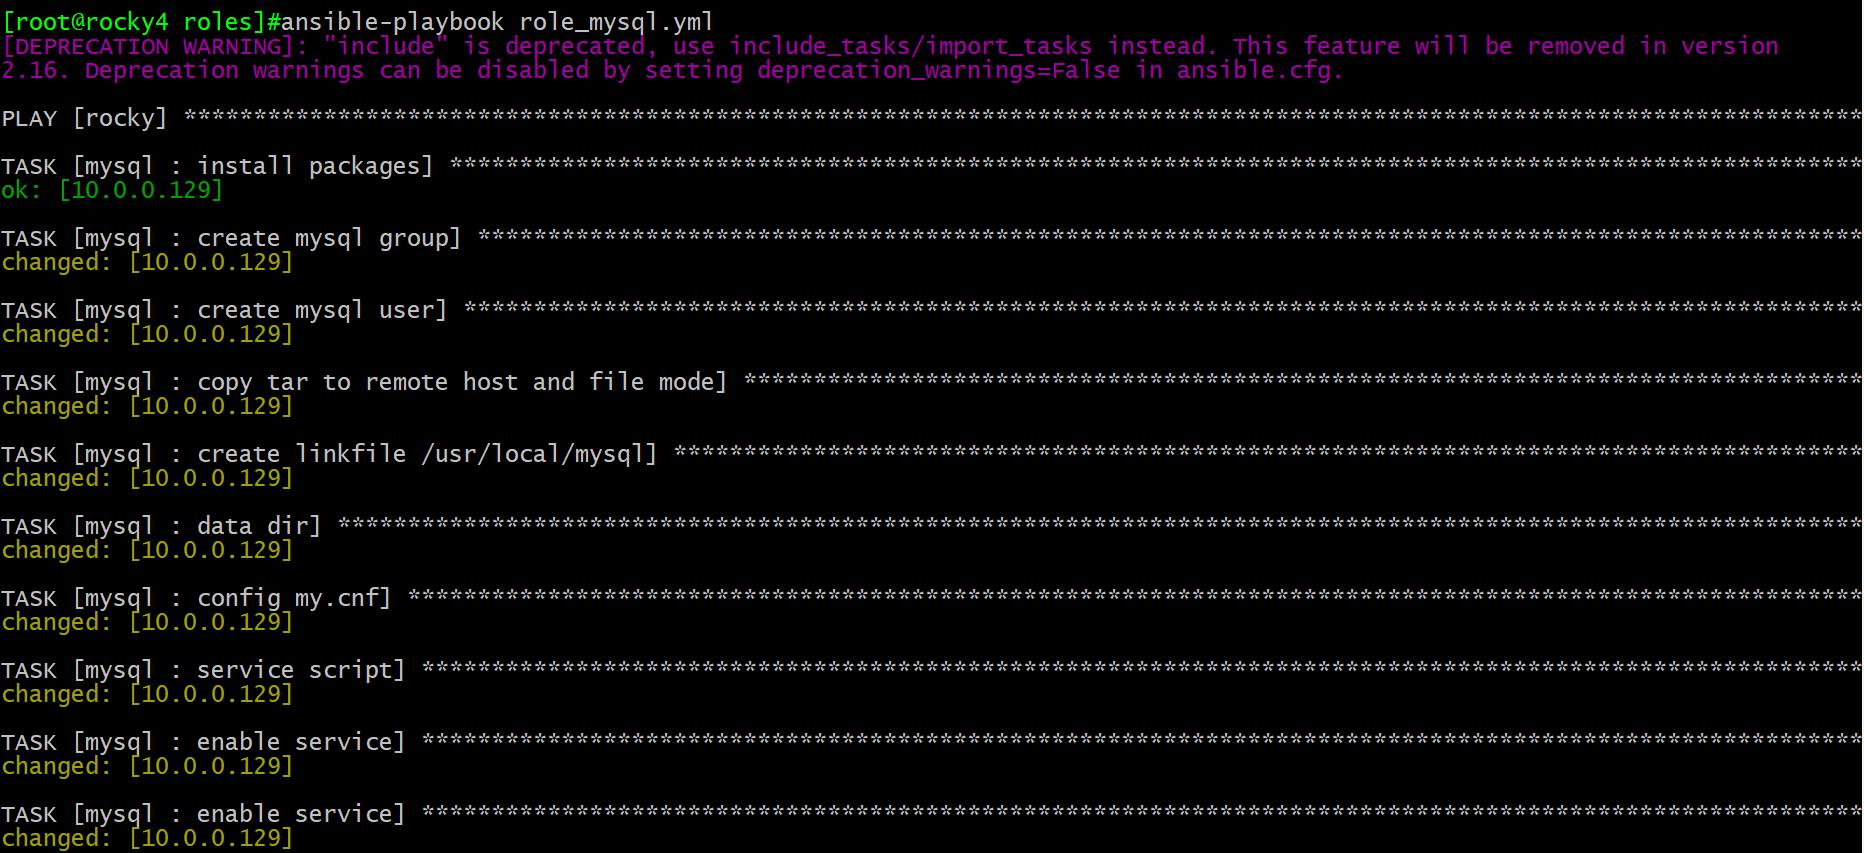
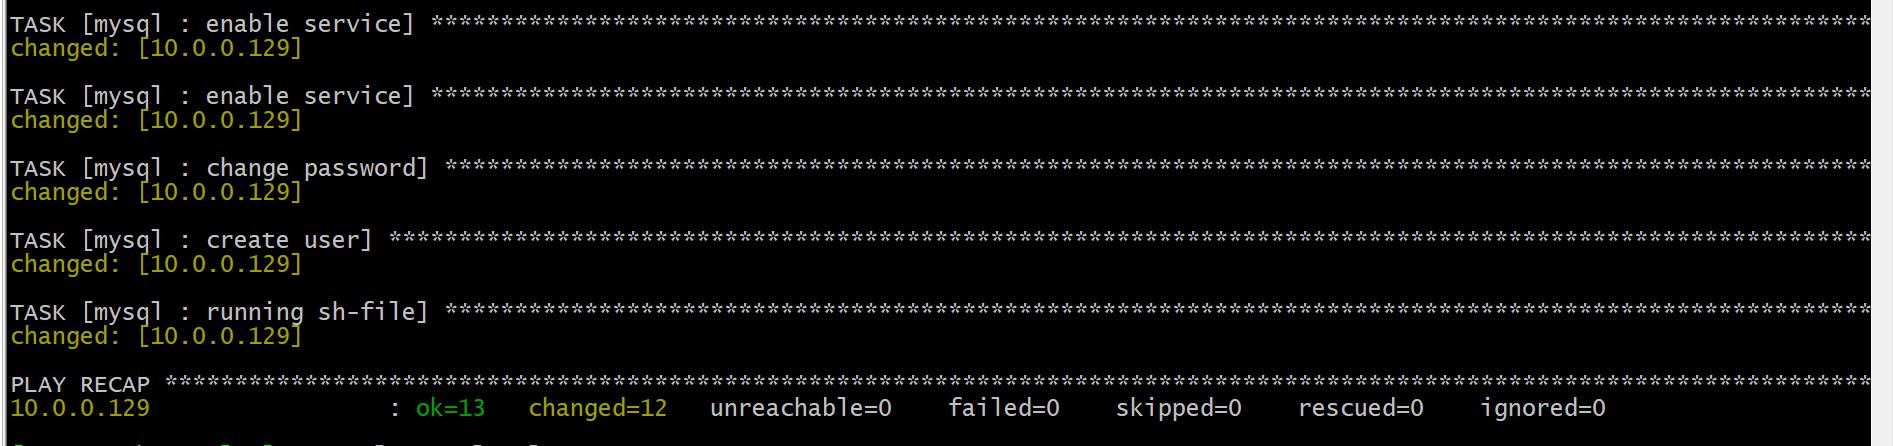
1、数据目录2、调用mysql-role cat role_mysql.yml --- - hosts: rocky remote_user: root gather_facts: no roles: - mysql 3、具体内容 cat mysql/files/create_user.sh #这个脚本因为软连接在ansible-playbook有bug,就在脚本中把创建软链接和创建wordpress的用户都写上了。这里没使用变量 #!/bin/bash ln -s /usr/local/mysql-8.0.27-linux-glibc2.12-x86_64/bin/* /sbin mysql -uroot -p123456 -e 'create database db1;' mysql -uroot -p123456 -e 'create user db1@"10.0.0.%" identified by "123456";' mysql -uroot -p123456 -e 'grant all on db1.* to db1@"10.0.0.%";' mysql -uroot -p123456 -e 'alter user db1@"10.0.0.%" identified with mysql_native_password by "123456";' mysql -uroot -p123456 -e 'flush privileges;' 4、tasks中的文件可以写到一个文件中,也可以写到多个文件模块文件中 cat config.yml - name: config my.cnf copy: src=/data/ansible/roles/mysql/files/my.cnf dest=/etc/my.cnf cat copy_sh.yml - name: create user copy: src=/data/ansible/roles/mysql/files/create_user.sh dest=/tmp - name: running sh-file shell: cmd: sh /tmp/create_user.sh cat data.yml - name: data dir shell: /usr/local/mysql/bin/mysqld --initialize-insecure --user=mysql --datadir=/data/mysql tags: data cat group.yml - name: create mysql group group: name=mysql gid=306 cat install.yml - name: install packages yum: name: - libaio - numactl-libs cat linkfile.yml - name: create linkfile /usr/local/mysql file: src=/usr/local/mysql-{{ mysql_version }}-linux-glibc2.12-x86_64 dest=/usr/local/mysql state=link #- name: create linkfile /sbin #file: path=/usr/local/mysql-{{ mysql_version }}-linux-glibc2.12-x86_64/bin/* dest=/sbin/ state=link owner=root group=root mode=0755 cat main.yml #调用所有的yml文件 - include: install.yml - include: group.yml - include: user.yml - include: unarchive.yml - include: linkfile.yml - include: data.yml - include: config.yml - include: script.yml - include: path.yml - include: service.yml - include: secure.yml - include: copy_sh.yml cat path.yml - name: enable service shell: chkconfig --add mysqld;/etc/init.d/mysqld start tags: service cat script.yml - name: service script shell: /bin/cp /usr/local/mysql/support-files/mysql.server /etc/init.d/mysqld cat secure.yml - name: change password shell: /usr/local/mysql/bin/mysqladmin -uroot password {{mysql_root_password}} cat service.yml - name: enable service shell: chkconfig --add mysqld;/etc/init.d/mysqld start tags: service cat unarchive.yml - name: copy tar to remote host and file mode unarchive: src={{mysql_file}} dest=/usr/local/ owner=root group=root cat user.yml - name: create mysql user user: name: mysql uid: 306 group: mysql shell: /sbin/nologin system: yes create_home: no home: /data/mysql cat mysql/vars/main.yml #这个变量可以单独放个文件,也可以放到hosts中 mysql_version: 8.0.27 mysql_file: mysql-{{mysql_version}}-linux-glibc2.12-x86_64.tar.xz mysql_root_password: 123456 5、执行role_mysql.yml
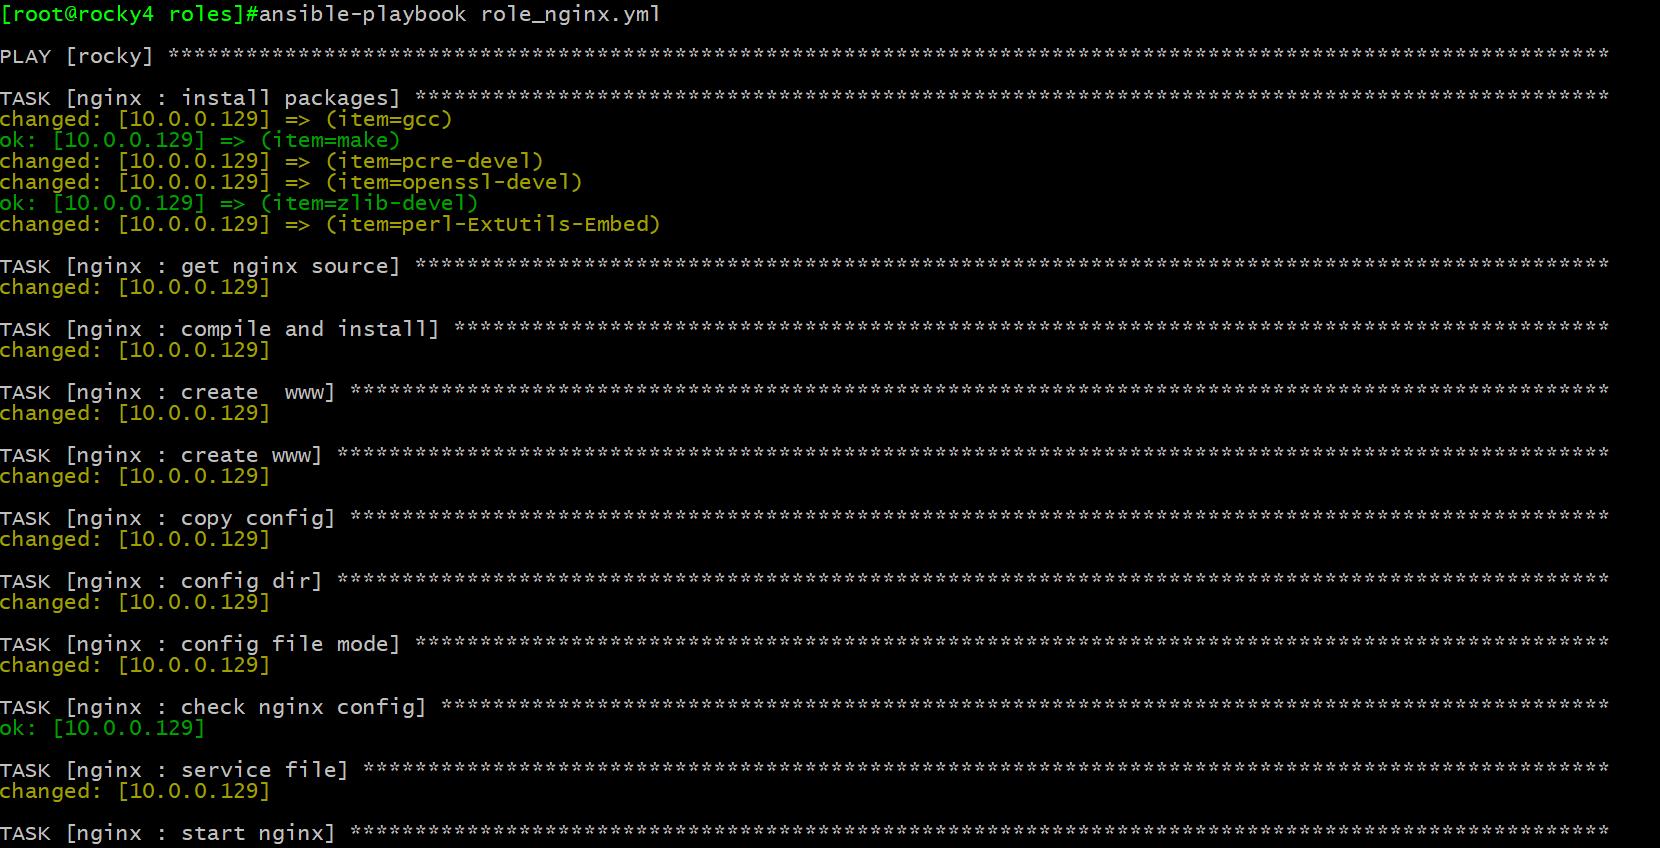
四、基于角色完成部署LNMP架构,并支持一键发布,回滚应用。同时基于zabbix角色批量部署zabbix。
1、前面mysql已经安装好了,这里讲nginx和php安装。
1.1 nginx
nginx:
1、数据目录
[root@rocky4 roles]#tree nginx
nginx
├── files
├── handlers
│ └── main.yml
├── tasks
│ └── main.yml
├── templates
│ ├── nginx.conf.j2
│ └── nginx.service.j2
└── vars
5 directories, 4 files
2、role内容
[root@rocky4 roles]#cat nginx_role.yml
- hosts: rocky
remote_user: root
roles:
- nginx
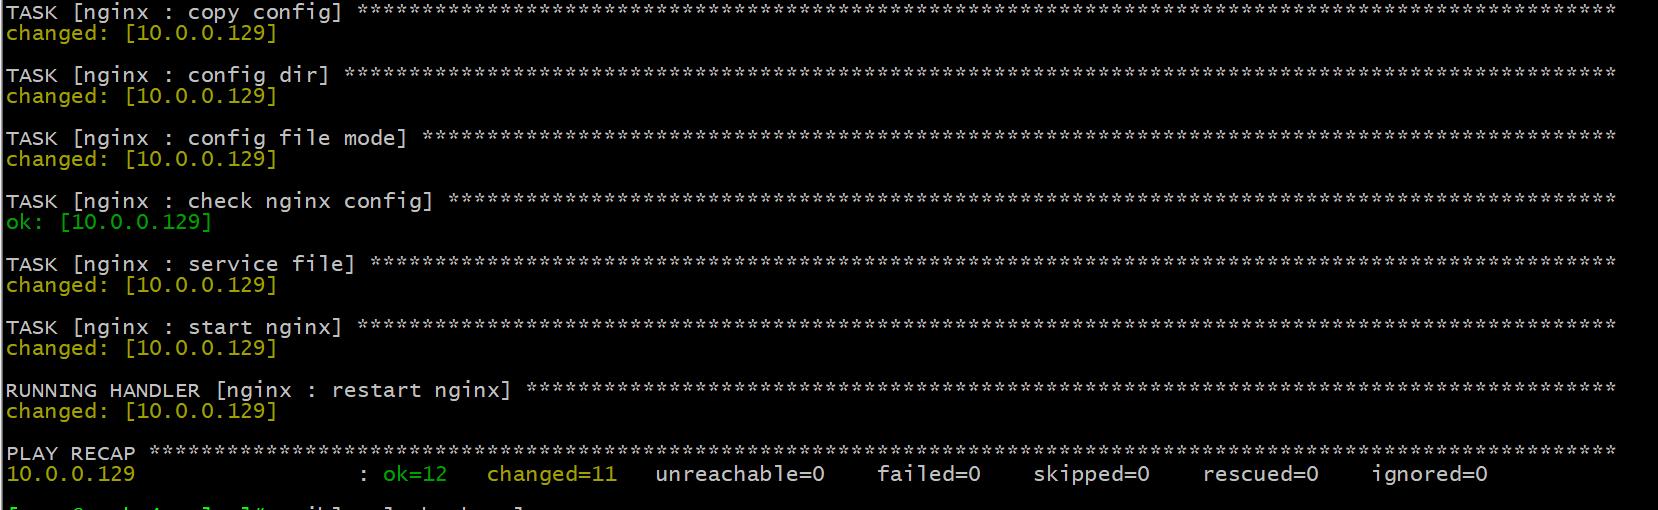
3、tasks内容
name: install packages
yum:
name: "{{ item }}"
loop:
- gcc
- make
- pcre-devel
- openssl-devel
- zlib-devel
- perl-ExtUtils-Embed
- name: get nginx source
unarchive:
src: "{{ url }}"
dest: "/usr/local/src"
remote_src: yes
- name: compile and install
shell:
cmd: "./configure --prefix={{ install_dir }} --user=nginx --group=nginx --with-http_ssl_module --with-http_v2_module --with-http_realip_module --with-http_stub_status_module --with-http_gzip_static_module --with-pcre --with-stream --with-stream_ssl_module --with-stream_realip_module && make && make install"
chdir: "/usr/local/src/nginx-{{ version }}"
creates: "{{install_dir}}/sbin/nginx"
- name: create {{ group }}
group:
name: "{{ group }}"
gid: "{{ gid}}"
- name: create {{ user }}
user:
name: "{{ user }}"
uid: "{{ uid }}"
group: "{{ group }}"
system: yes
- name: copy config
template:
src: nginx.conf.j2
dest: "{{install_dir}}/conf/nginx.conf"
notify:
- restart nginx
- name: config dir
file:
path: "{{install_dir}}/conf.d"
state: directory
- name: config file mode
file:
path: "{{install_dir}}"
owner: "{{ user }}"
group: "{{ group }}"
recurse: yes
- name: check nginx config
shell:
cmd: "{{install_dir}}/sbin/nginx -t"
register: check_nginx_config
changed_when:
- check_nginx_config.stdout.find('successful')
- false
- name: service file
template:
src: nginx.service.j2
dest: /lib/systemd/system/nginx.service
- name: start nginx
service:
name: nginx
state: started
enabled: yes
4、templates内容
cat nginx/templates/nginx.conf.j2
user {{ user }};
worker_processes auto;
#error_log logs/error.log;
#error_log logs/error.log notice;
#error_log logs/error.log info;
#pid logs/nginx.pid;
events {
worker_connections 1024;
}
http {
include mime.types;
default_type application/octet-stream;
#log_format main '$remote_addr - $remote_user [$time_local] "$request" '
# '$status $body_bytes_sent "$http_referer" '
# '"$http_user_agent" "$http_x_forwarded_for"';
#access_log logs/access.log main;
keepalive_timeout 65;
include {{install_dir}}/conf.d/*.conf;
}
cat nginx/templates/nginx.service.j2
[Unit]
Description=The nginx HTTP and reverse proxy server
After=network.target remote-fs.target nss-lookup.target
[Service]
Type=forking
PIDFile={{ install_dir }}/logs/nginx.pid
ExecStartPre=/usr/bin/rm -f {{ install_dir }}/logs/nginx.pid
ExecStartPre={{ install_dir }}/sbin/nginx -t
ExecStart={{ install_dir }}/sbin/nginx
ExecReload=/bin/kill -s HUP $MAINPID
KillSignal=SIGQUIT
TimeoutStopSec=5
KillMode=mixed
PrivateTmp=true
[Install]
WantedBy=multi-user.target
5、handlers内容
cat nginx/handlers/main.yml
- name: restart nginx
service:
name: nginx
state: restarted
6、这里变量存在了ansible的hosts文件中,也可以存在nginx目录下的vars中
cat /etc/ansible/hosts
[rocky:vars]
uid=88
user=www
gid=88
group=www
version="1.20.2"
url="http://nginx.org/download/nginx-{{ version }}.tar.gz"
install_dir="/apps/nginx"
7、执行结果
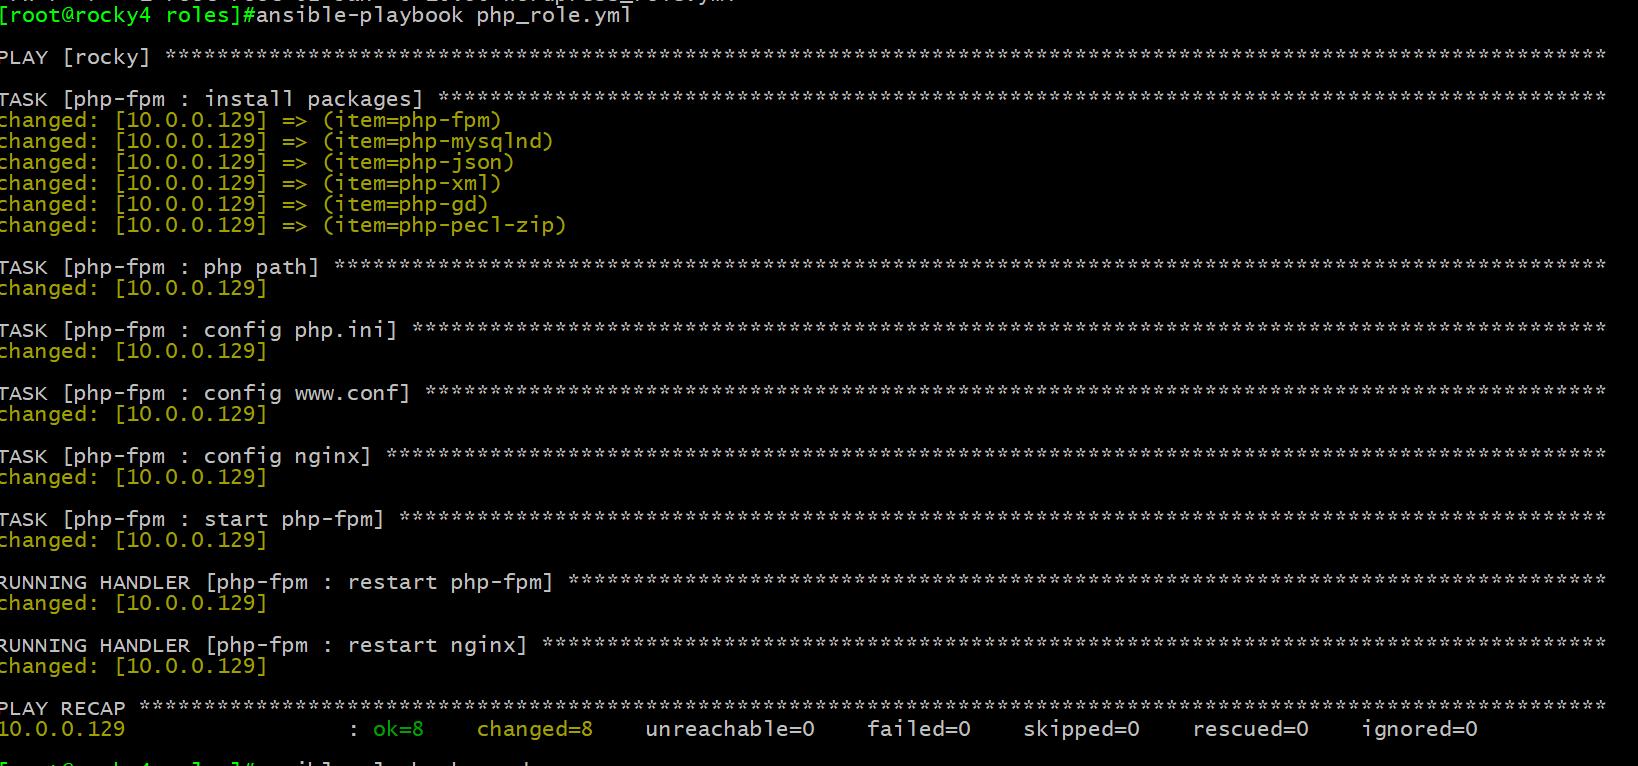
1.2 php-fpm---这里需要注意:因为php的用户和nginx的www用户一致,所有只在nginx角色中创建用户了,要先运行nginx角色,不然php安装时找不到www用户会报错
php-fpm:
1、数据目录
tree php-fpm/
php-fpm/
├── files
│   └── test.php
├── handlers
│   └── main.yml
├── tasks
│   └── main.yml
├── templates
│   ├── php-fpm.conf.j2
│   ├── php.ini.j2
│   ├── w.conf.j2
│   └── www.conf.j2.bak
└── vars
5 directories, 8 files
2、tasks中main内容
- name: install packages
  yum:
    name: "{{ item }}"
  loop:
    - php-fpm
    - php-mysqlnd
    - php-json
    - php-xml
    - php-gd
    - php-pecl-zip

- name: php path
  file:
    path: /var/lib/php/
    owner: "{{ user }}"
    group: "{{ group }}"
    recurse: yes

- name: config php.ini
  template:
    src: php.ini.j2
    dest: /etc/php.ini
  notify: restart php-fpm

- name: config www.conf
  template:
    src: w.conf.j2
    dest: /etc/php-fpm.d/www.conf
  notify: restart php-fpm

- name: config nginx
  template:
    src: php-fpm.conf.j2
    dest: "{{ install_dir }}/conf.d/php-fpm.conf"
  notify: restart nginx


- name: start php-fpm
  service:
    name: php-fpm
    state: started
    enabled: yes
2、files中的test.php,这是个测试页面
cat php-fpm/files/test.php
<?php
phpinfo();
?>
3、handlers中的,main内容
cat php-fpm/handlers/main.yml
- name: restart php-fpm
  service:
    name: php-fpm
    state: restarted

- name: restart nginx
  service:
    name: nginx
    state: restarted
4、templates中的php-fpm.conf.j2
cat php-fpm/templates/php-fpm.conf.j2
##
server {
    listen 80;
    server_name {{ fqdn }};
    root {{ root_path }};
    index index.php;
    location ~ \.php$ {
        root  {{ root_path }}  ;
        fastcgi_pass   127.0.0.1:9000;
        fastcgi_index  index.php;
        fastcgi_param  SCRIPT_FILENAME  $document_root$fastcgi_script_name;
        include        fastcgi_params;

    }
}
5、templates中的php.ini.j2
grep -v '^;\|^$' php-fpm/templates/php.ini.j2
[PHP]
engine = On
short_open_tag = Off
precision = 14
output_buffering = 4096
zlib.output_compression = Off
implicit_flush = Off
unserialize_callback_func =
serialize_precision = -1
disable_functions =
disable_classes =
zend.enable_gc = On
expose_php = On
max_execution_time = 360
max_input_time = 600
memory_limit = 128M
error_reporting = E_ALL & ~E_DEPRECATED & ~E_STRICT
display_errors = Off
display_startup_errors = Off
log_errors = On
log_errors_max_len = 1024
ignore_repeated_errors = Off
ignore_repeated_source = Off
report_memleaks = On
html_errors = On
variables_order = "GPCS"
request_order = "GP"
register_argc_argv = Off
auto_globals_jit = On
post_max_size = 80M
auto_prepend_file =
auto_append_file =
default_mimetype = "text/html"
default_charset = "UTF-8"
doc_root =
user_dir =
enable_dl = Off
file_uploads = On
upload_max_filesize = 80M
max_file_uploads = 20
allow_url_fopen = On
allow_url_include = Off
default_socket_timeout = 60
[CLI Server]
cli_server.color = On
[Date]
date.timezone = Asia/Shanghai
[filter]
[iconv]
[intl]
[sqlite3]
[Pcre]
pcre.jit=0
[Pdo]
[Pdo_mysql]
pdo_mysql.cache_size = 2000
pdo_mysql.default_socket=
[Phar]
[mail function]
sendmail_path = /usr/sbin/sendmail -t -i
mail.add_x_header = On
[ODBC]
odbc.allow_persistent = On
odbc.check_persistent = On
odbc.max_persistent = -1
odbc.max_links = -1
odbc.defaultlrl = 4096
odbc.defaultbinmode = 1
[Interbase]
ibase.allow_persistent = 1
ibase.max_persistent = -1
ibase.max_links = -1
ibase.timestampformat = "%Y-%m-%d %H:%M:%S"
ibase.dateformat = "%Y-%m-%d"
ibase.timeformat = "%H:%M:%S"
[MySQLi]
mysqli.max_persistent = -1
mysqli.allow_persistent = On
mysqli.max_links = -1
mysqli.cache_size = 2000
mysqli.default_port = 3306
mysqli.default_socket =
mysqli.default_host =
mysqli.default_user =
mysqli.default_pw =
mysqli.reconnect = Off
[mysqlnd]
mysqlnd.collect_statistics = On
mysqlnd.collect_memory_statistics = Off
[PostgreSQL]
pgsql.allow_persistent = On
pgsql.auto_reset_persistent = Off
pgsql.max_persistent = -1
pgsql.max_links = -1
pgsql.ignore_notice = 0
pgsql.log_notice = 0
[bcmath]
bcmath.scale = 0
[browscap]
[Session]
session.save_handler = files
session.use_strict_mode = 0
session.use_cookies = 1
session.use_only_cookies = 1
session.name = PHPSESSID
session.auto_start = 0
session.cookie_lifetime = 0
session.cookie_path = /
session.cookie_domain =
session.cookie_httponly =
session.serialize_handler = php
session.gc_probability = 1
session.gc_divisor = 1000
session.gc_maxlifetime = 1440
session.referer_check =
session.cache_limiter = nocache
session.cache_expire = 180
session.use_trans_sid = 0
session.sid_length = 26
session.trans_sid_tags = "a=href,area=href,frame=src,form="
session.sid_bits_per_character = 5
[Assertion]
zend.assertions = -1
[mbstring]
[gd]
[exif]
[Tidy]
tidy.clean_output = Off
[soap]
soap.wsdl_cache_enabled=1
soap.wsdl_cache_dir="/tmp"
soap.wsdl_cache_ttl=86400
soap.wsdl_cache_limit = 5
[sysvshm]
[ldap]
ldap.max_links = -1
[dba]
[curl]
[openssl]
6、templates下的w.conf.j2文件
cat php-fpm/templates/w.conf.j2
[www]
user = {{ user }}
group = {{ group }}
listen = 127.0.0.1:9000
listen.acl_users = apache,nginx
listen.allowed_clients = 127.0.0.1
pm = dynamic
pm.max_children = 50
pm.start_servers = 5
pm.min_spare_servers = 5
pm.max_spare_servers = 35
slowlog = /var/log/php-fpm/www-slow.log
php_admin_value[error_log] = /var/log/php-fpm/www-error.log
php_admin_flag[log_errors] = on
php_value[session.save_handler] = files
php_value[session.save_path]    = /var/lib/php/session
php_value[soap.wsdl_cache_dir]  = /var/lib/php/wsdlcache
7、执行结果
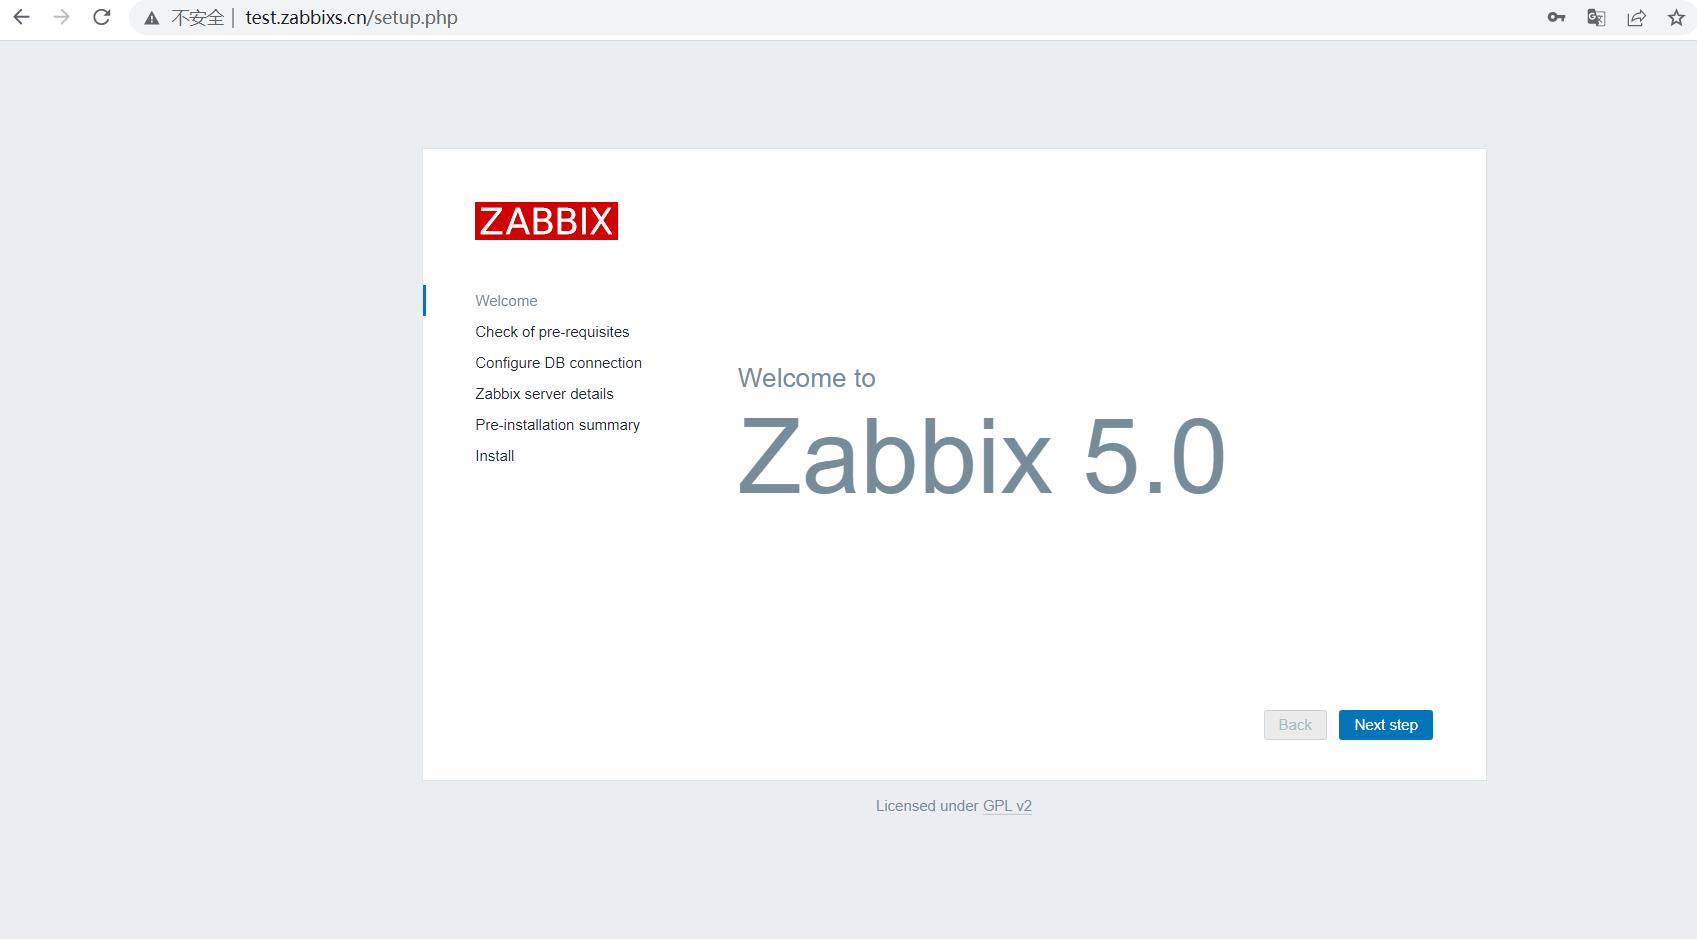
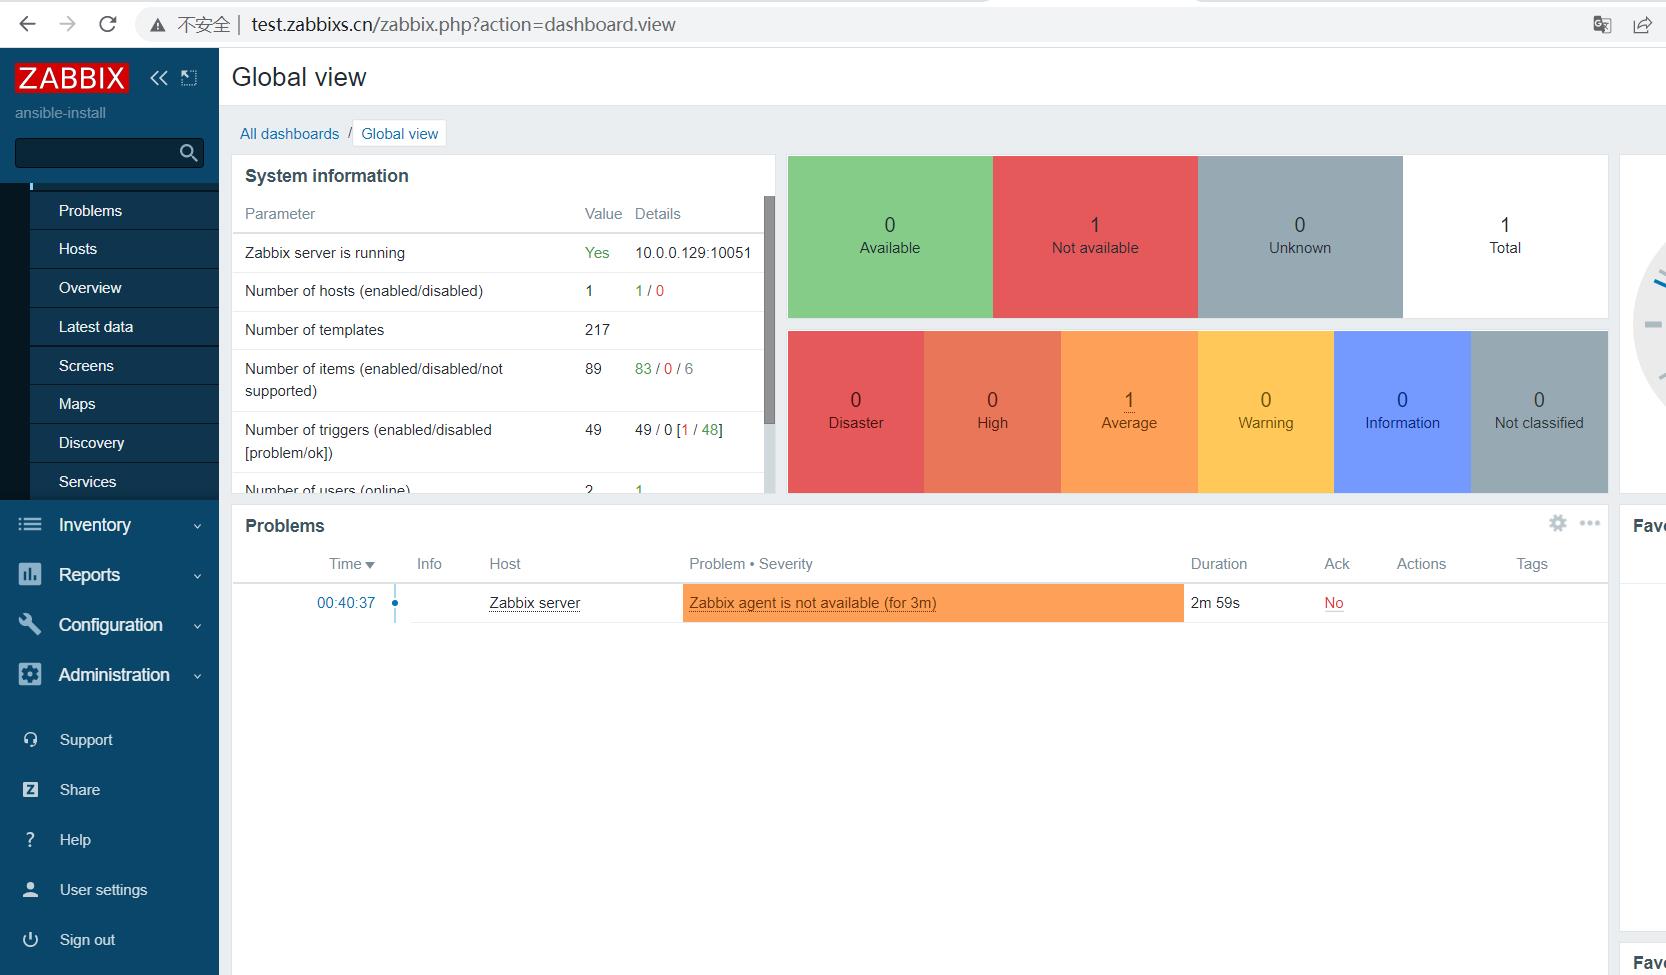
1.3 zabbix-server角色部署,过程和文件太多,这里我直接贴图片,把代码放到最后,有需要的朋友可自行下载。上面mysql、php、nginx都是分开部署的,最后写完zabbix-server使用一键部署。在zabbix-server的目录下创建meta文件夹,写入角色依赖即可。
1、2、
3、
4、
5、
6、
7、zabbix_server结果
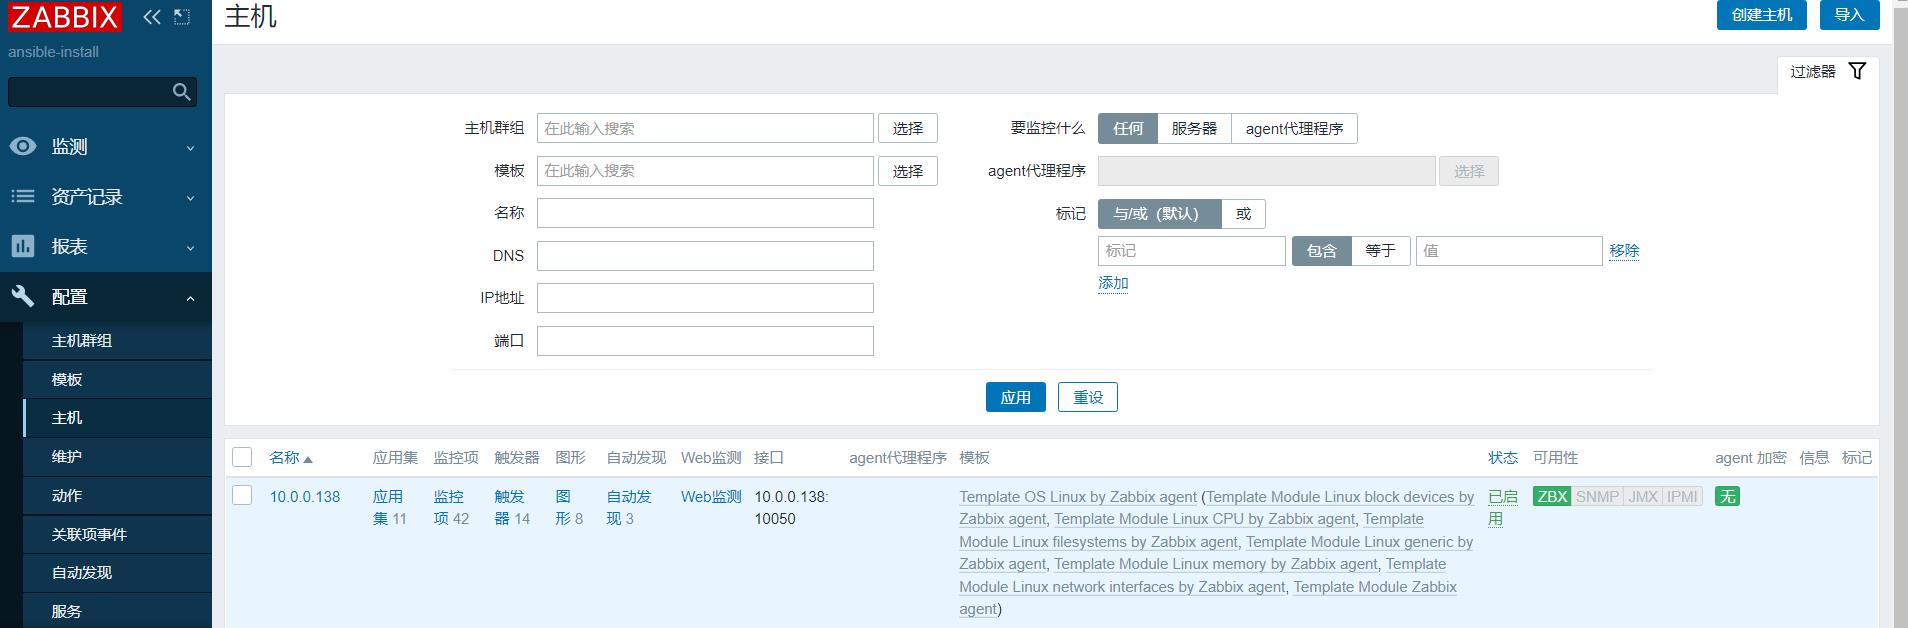
1.4 zabbix-agent角色,还是直接上图,完了附代码
1、2、
3、
链接:https://pan.baidu.com/s/1PEhALvBmpdlJ2SqLcIy6Gw
提取码:8qzs